
 Changes
in progress January 2013
Changes
in progress January 2013
This is the newest page describing the progress on the Quaker Valley Railroad and a discussion of JMRI turnout and signal lever operations.
Older info on the CTC panel development can be found at http://www.quaker-valley.com/CTC/CTC_Index.html
A three part pdf tutorial for the JMRI Panel Pro and Layout Editor is available at http://www.quaker-valley.com/CTC/JMRI_Panel_Tutorial.html
The Quaker Valley Railroad has been developing a CTC Panel using the Panel Pro feature in Decoder Pro since 2003 when I saw the CTC panel Bob Jacobsen and Nick Kulp were developing. In the summer of 2006, I attended the NMRA Philadelphia Convention and sat in on all of the JMRI clinics. I met some of the key people behind the JMRI development and learned a lot, especially about the then newest features of Panel Pro in version 1.7.5. I also gave a clinic describing how I was using JMRI Panel Pro with my NCE system to develop a virtual CTC panel. I even had acquired a clunky old touch screen monitor which allowed me to change the lever position by touching them on the screen. This meant no more mouse or trackball for the Dispatcher. In late 2011 I obtained one of the new flat panel touch screens which has made it even nicer!
By the end of 2007, I had added three more AD4HC accessory decoders to the Quaker Valley, automating 11 turnouts or turnout pairs. You can see how I mounted the CVP accessory decoder cards at http://www.quaker-valley.com/CTC/AD4.html This completed the conversion of all main line turnouts to DCC control. This permitted me to complete the CTC panel with all turnout levers active and block detection on the single track QV line under control of the NCE DCC command station.
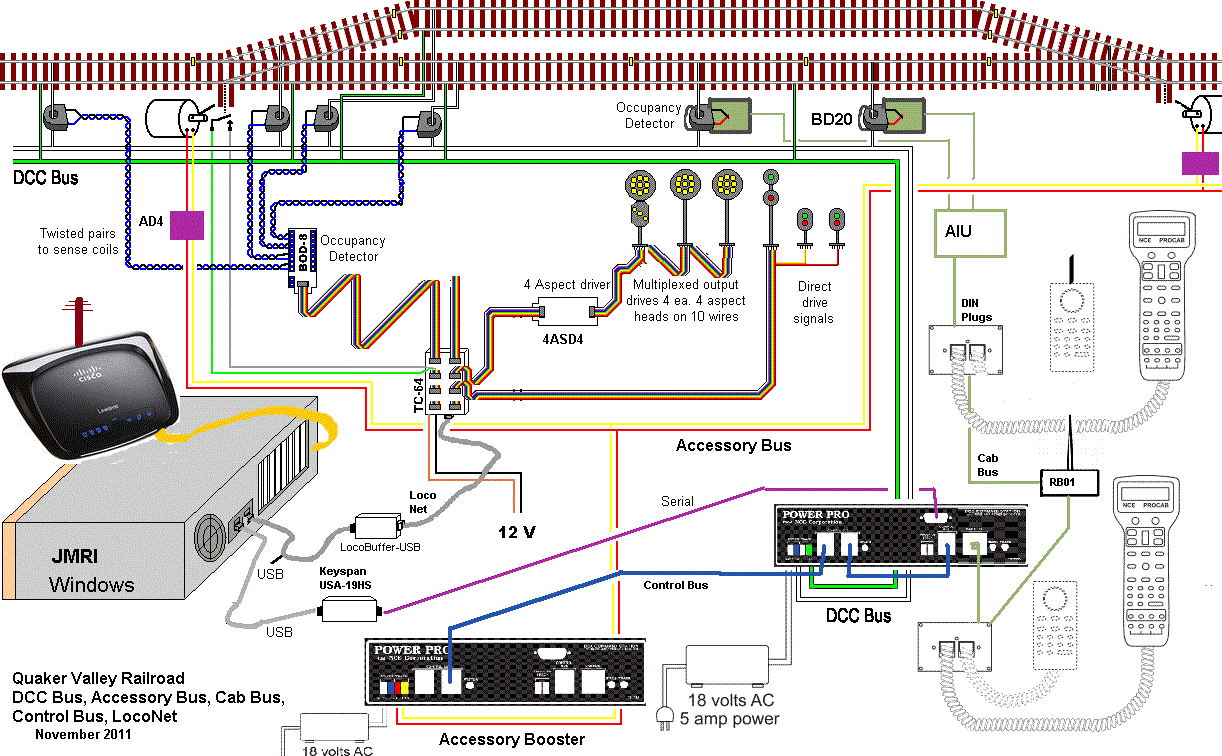
In late 2009, I added some new hardware from RR-Cirkits,
creating a stand alone LocoNet allowing me to complete block detection
of the Conrail mainline. It also will allow addition of physical signaling track
side. Hardware includes a Locobuffer USB, TC64 Tower Controller, BOD8
block detectors and 4ASD signal drivers. This setup does not
require a separate command station and integrates with my NCE system
using JMRI Panel Pro. So I continued to update the JMRI
Panel Pro created CTC panel as I added detection to all mainline blocks
as shown by the TOL indicators. Using the JMRI Logix, the signal lights
on the panel
drop as the trains progress through each control point. Since all
of the turnout levers worked, the
Dispatcher abandoned the
old DC control panel with push buttons and rotary switches and controls
everything from a dual monitor PC setup.
I always wanted to develop the panel to use the turnout and signal levers and code button just like the real ones. I thought it would require scripting, but found a way around that in 2006 using transparent sensors to control a 3 position icon. Since then the newer versions of JMRI have multi position sensors, and it has worked well to add the signal levers to the Quaker Valley CTC panels. The signal levers shown now work pretty much like the prototype. The code button at the bottom of each position is momentary and controls the turnout and signals. You can flip the turnout levers back and forth without setting the turnouts. Only when the code button is pressed does the turnout and signal follow. And because of the way the JMRI route function can work, they will only follow if the interlocking is unoccupied and the block ahead is unoccupied and the block ahead is not assigned to a train coming the other way. No more throwing turnouts under moving trains. It is nice to develop things on a screen and if it is not right, easily change it. I suspect many will develop their model railroad CTC controls this way before constructing a full size CTC panel.
December 2011 Quaker Valley CTC Panel
Santa came early in 2011 and delivered a HP 2105TM touch monitor. This is a HD quality flat screen with touch capability and can be found under $300. Because of the higher resolution, I was able to split the old dual CTC panel into two larger panels, spreading out the graphics and icons. Both the Quaker Valley and Conrail panels share the same monitor, but a touch will bring one or the other to the front. The latest version of the panel still includes sound to the code buttons and some toggle switches. I had also added a bell when the trains OS (go on sheet) at each of the QVRR control points and when a B&O train shows up from Punxsutawney or Cumberland and when trains are powered up in the Conrail Staging. Using a faster laptop, I am encouraged to add more and more animation and sound to the panel.
Several years ago I added a JMRI clock to the QV CTC panel . After upgrading to version 2.6, I experimented with Ken Cameron's NCE clock contribution originally out in version 1.9.2. It now is a fast clock married to the NCE command station. I even added a toggle switch to turn it on and freeze time if the Dispatcher desires. With the space permitted with the new monitor, I thought it should be moved off of the panel and found a nice oak wood case to house it. (This is all on the monitor) I later added an animated pendulum to the regulator clock. The swinging pendulum shows through a transparency in the clock body on the xml panel.The track diagrams for both panels were developed using MS Paint. I cut them
from the older dual panel and resized and cleaned them up. Making the Conrail panel more
than the prototypical US&S panel 15 wide, I was able to create some
space between interlockings and move two turnout levers that lived on
the upper panel before. I added a US&S plate to each panel,
the one I had created from a scan of a real plate from a
photo.
The Quaker Valley panel represents the modeled portion of my Quaker Valley line which runs north and south between Buffalo NY, through Costello and ending in Lynnsburg, a town in the hills of Western Pennsylvania between Altoona and Johnstown. The Conrail panel shows Conrail's secondary track between these two towns. I have abbreviated the staging yard tracks on either side of the modeled lines. In reality, the yards at McKeesport and Altoona are two ends of the same Westbound staging yard. Johnstown and Harrisburg are the Eastbound staging yard.
Overlapping Conrail CTC Panel on same screen
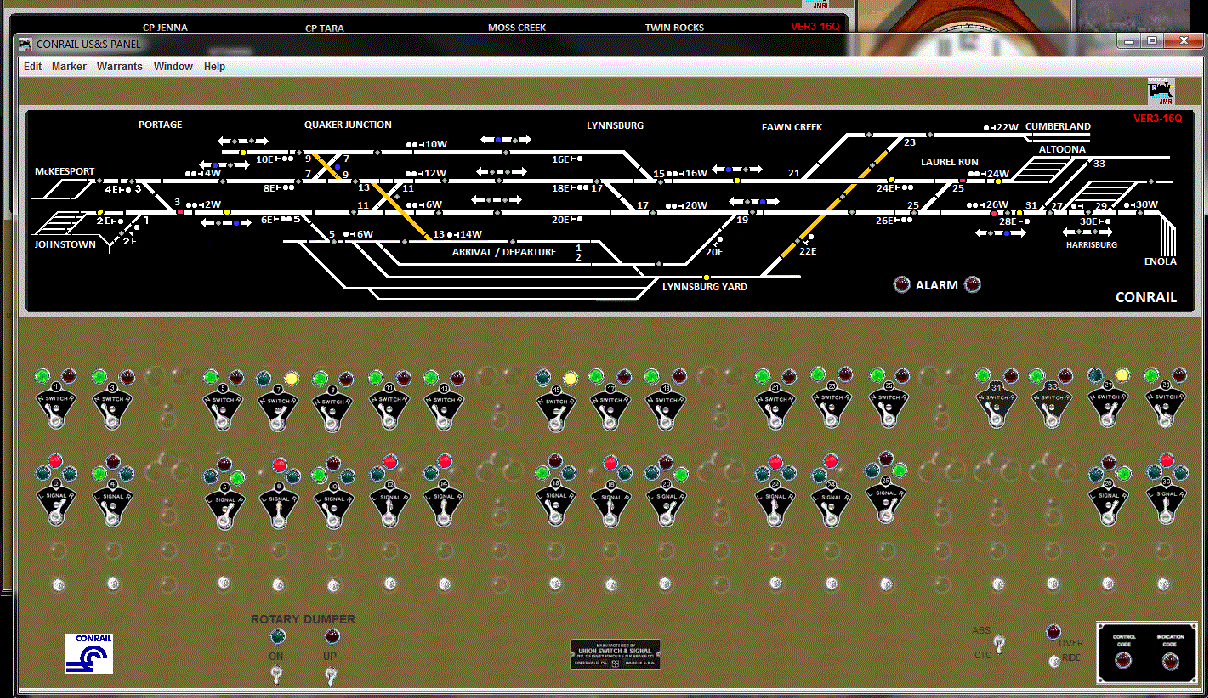
With more room, I added the traffic control lights and traffic
direction arrows to both panels. I had placed that logic in
the panel in 2008, but saw a more prototypical way to display them in
Dick Bronson's 2009 clinics and on the Rule 281 Series DVD from CTC
Parts. (link to CTC Parts) These traffic control lights are used to "reserve" a track for a
train that is not yet there and stop assignment of that same track to
another opposing train. The DVD convinced me to make these lights blue
as per a PRR panel on the prototype. That was real simple to edit and
change in
Panel Pro.
It was actually easier than I thought to make the two CTC panels
separate frames. I have always included all of the tables
(sensors, turnout, route and Logix) along with the CTC panel and layout
editor panel in one large xml file. I simply moved the old CTC
panel, renamed and resized it and saved the complete xml under a new
name. I then restarted JMRI, loaded both the new panel and the
original panel files. It warned me I was loading a duplicate
layout editor which I skipped. I resaved the complete file
and closed JMRI. I checked the xml with WordPad and didn't find
any duplicate Logix or routes. I reloaded JMRI and the new panel
and did not see any duplicate turnout or sensor table entries.
All was good. I simply removed the icon elements from each panel
that were not needed. I reworked the graphics and continue to
refine the new panels.


Since that time, I have added and refined the SSL (Simple Signal Logic) behind the signals shown. The turnouts are animated in the layout editor and the signals work. In edit mode, the layout editor allows you to open the signal logic and correct it. I have JMRI showing occupied track in red or maroon. Unoccupied tracks are show in black. The layout editor panel shows all of the internal signals I used to complete the Simple Signal Logic. These intermediate signals are internal and now only show when in edit mode. I have added the signal held Logix to all of the lower panel (Conrail) signals and then added a CTC-ABS switch to make the signals pop back up when running for open house guests. When in CTC position, the CTC panel takes charge and holds (Red) signals over what is essentially an ABS signal logic.
Progress on signaling was slow in 2010, but the east bound
signal at Laurel Run has been installed on the railroad and is a
working PRR position style single head mast. I have assembled a working
prototype of the two headed PRR position signal which will display
clear, approach and stop aspects on the upper head and light the lower
head for restricting moves. Two of these will be installed on a signal
bridge at the west bound Laurel Run location. The restricting aspect
will control entry into the Lynnsburg yard.
I continue to update parts of the
CTC panel as I have been learning how to better use the newer Logix,
grouped sensors and the multi sensor icon introduced in JMRI version
1.9.1. I am now running the 3.6 production version of JMRI Panel Pro, and will
continue to upgrade in the future. So how does this all work in
Panel Pro?
Check the web page here for a complete introduction to US&S CTC construction using JMRI.
During the first half of 2012, I developed a JMRI panel tutorial. It comes as a three part pdf file and describes how to use Panel Pro to develop a CTC panel and to use Layout Editor for a complimentary animated panel with block detection and signaling. Check the web page here for the Panel Tutorial.
I had been using an AIU Auxiliary Input
Unit and 14 BD20 block
detectors from NCE since 2003. All mainline turnouts were
converted to using a mix of accessory decoders including CVP
AD4HC, NCE Switch-It and Snap-It. In late 2009, I added some new
hardware from RR-Cirkits,
creating a stand alone LocoNet allowing me to complete block detection
of the Conrail mainline. It also will allow addition of signaling track
side. Hardware includes a Locobuffer USB, TC64 Tower Controller, BOD8
block detectors and 4ASD signal drivers. The BD20 detectors
actually have 1 or 2 loops through their core, where the BOD8
does not require but a single pass straight through. This
LocoNet setup does not
require a separate command station and integrates with my NCE system
using JMRI Panel Pro. (More info here) I have completed the process of updating the JMRI
Panel Pro created CTC panel. The image below was borrowed from
Dick Bronson and the RR-Cirkits website. It has been modified to
show the
relation
of the
various connections used to make all of this come to life on the Quaker
Valley. On the layout the DCC bus is split into 4 power districts
each protected by a fast acting breaker. I use DIN plugs on the
cab bus, using twisted wire for the data lines. Over Thanksgiving
weekend 2011, I completed the wiring for the accessory bus and
activated a second
DCC booster which is completely separate from
the DCC track bus. I also added the recommended snubbers to
control the noise on the track bus.This should avoid the noise issues
that have
accidentally reprogrammed the accessory decoders on more than one
instance.
I hope to eliminate any erratic accessory decoder operation after these
changes in the wiring were made.
Sweet! And JMRI is always getting better. Seems the JMRI guys add things just as I need them. Or before I know I need them. For example, I still plan to connect the second NCE command station to JMRI, providing a program track that will not shut down the layout. The JMRI developers have now gone well beyond my original wish list. Integrating the NCE and LocoNet hardware into one functioning system allows me to replicate the prototype US&S CTC machines of the 1960s and 1970s. I continue experimenting with the layout editor and it does make it easy to develop signaling as I am adding signal hardware to the railroad. In 2012, I experimented with Ken Cameron's RobotThrottle3 script and modified the BackAndForth script to run trains during open house events. In 2013 I activated the JMRI web server, Engine Driver and displays on an Android tablet. Check here for more info. And Decoder Pro / Panel Pro is still freeware. But donations to JMRI are always welcome. Thank you Bob Jacobsen, Dick Bronson and the rest of the JMRI development crew!
Learn more about the JMRI project, Decoder Pro and Panel Pro at http://www.jmri.org
Learn more about CTC panels in the Rule 281 Series DVD from CTC Parts. http://www.ctcparts.com/video.htm
Signal and detection hardware from RR-Cirkits. http://www.rr-cirkits.com
I used the Tower Controller in 2009, but would recommend you look at
the LNCP. I have helped a friend implement detection and
signaling with the new hardware distributed locally around the
layout. I also have shepherded two PA model railroad clubs to go this route. Stand alone Loconet information.
A three part pdf tutorial for the JMRI Panel Pro and Layout Editor is available at http://www.quaker-valley.com/CTC/JMRI_Panel_Tutorial.html
Pictures and plans for the host layout can be found at http://www.quaker-valley.com/QV_Layout.html
Revised January 12, 2014
Bob Bucklew
Quaker Valley Software
bob@quaker-valley.com
 Return to Quaker Valley
Home Page
Return to Quaker Valley
Home Page